One of my hobbies is building and flying small quadcopter radio control (RC) aircraft. Most RC aircraft use a one way transmitter – the remote control is the transmitter and there is a receiver on the aircraft to process received commands for flying the aircraft. But the aircraft does not transmit anything back to the control unit – you have no way of knowing when the battery is about to reach empty!
Some RC aircraft use Wi-Fi or proprietary links sending data in both directions – those quads send an alert when the battery is low.
But for simple systems, there is no alert!
A crashed my small quad recently due to draining the battery. I was flying it back to land when its battery died. While only 2 meters off the ground, it came down hard and damaged a prop and motor. (I was flying at an AMA approved RC model airfield so this was all done safely over a grassy area.)
To solve this, I decided I needed a count down timer app that gives me an alert after 10-15 minutes of flying.
That’s where App Inventor comes in.
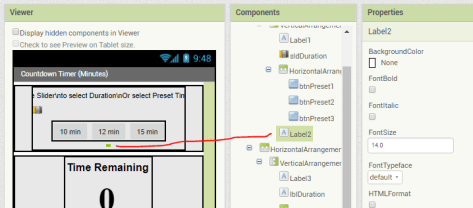
User Interface View
To set the countdown timer, move the slider control to select a number of minutes between 0 and 59. Or, select one of the “preset” buttons which set the time limit to 10, 12 or 15 minutes.
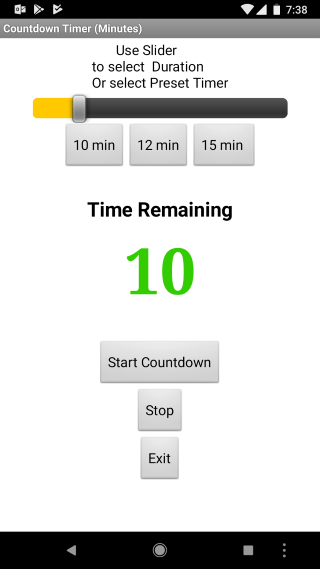
Press the Start Countdown button to activate. The count down timer shows the remaining time in minutes and seconds.
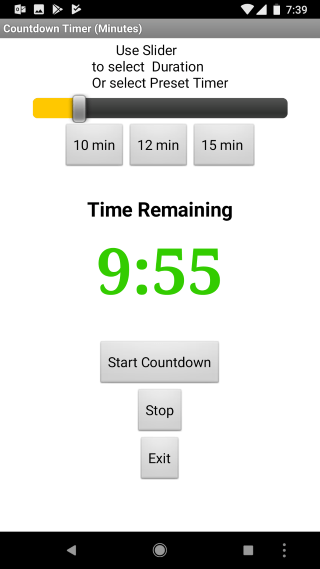
Once the timer reaches 3 minutes, the remaining time color changes to red and an audio alert “3 minutes” is played. At 2 minutes, there is a “2 minutes” alert and then a “1 minute” alert when there is 1 minute remaining.
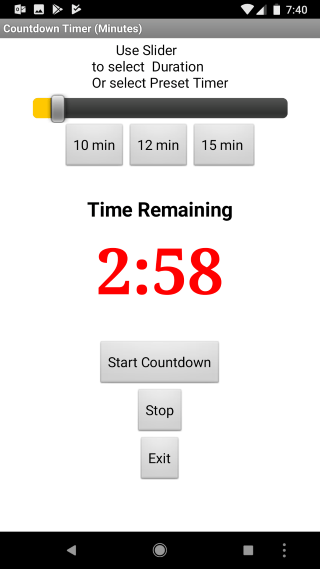
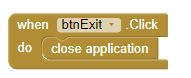
The Stop button stops the timer and resets everything to zero. The Exit button closes the application.
Designer View
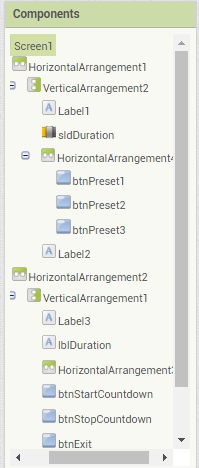
I used a combination of horizontal and vertical layouts to place the controls on screen.
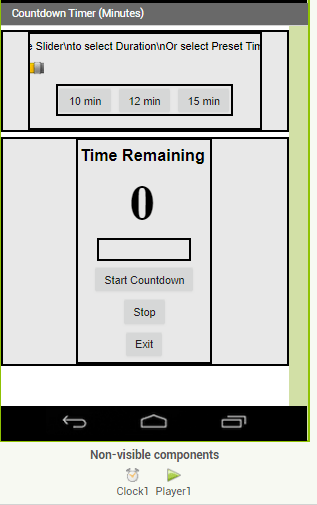
The top most item is a label. I wanted the prompt text to center over the controls so I used the \n newline character to create line breaks in the label text, splitting the text into 3 lines on screen.
The Clock component manages the count down timer. Player plays MP3 files containing the 3, 2 and 1 minute alerts.
Components List

Designer Properties
To add some space between on screen elements of the user interface, I inserted a Label component and set its text field to blank.
In the section showing the countdown timer, I added some blank space by inserting a HorizontalArrangement layout and set its height to 5 percent.

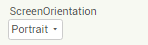
This app is designed to work in Portrait mode – the user interface does not lay out properly in Landscape mode so I selected Screen1‘s properties and set ScreenOrientation to Portrait.
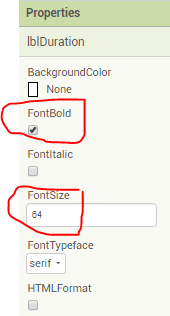
The count down timer is displayed in large font. It is just a regular Label but with the font set to Bold and the FontSize set to 64.
The slider control has its width set to 80 percent the width of its surrounding container, which is the HorizontalLayout it sits within. The MinValue and MaxValue are set to 0 and 59.

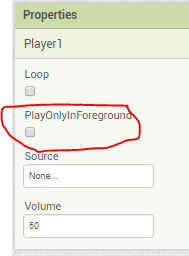
The Player control plays MP3 files. We want the Player to operate in the background so the timer will continue to count down while the alert message is playing. Make sure the PlayOnlyInForeground property of the Player control is not checked.
Blocks View
The “heart” of this app is in the Clock1.Timer event, but we will get to that last in our description.
The user interface selects the number of minutes for the timer, such as 10 minutes. In the app we convert this to seconds by multiplying 10 x 60, giving us 600 seconds. Every second, the timer counts down by one second.
We use the global variable CountdownTimerSeconds to keep track of the seconds remaining.

When the app starts running, we make sure the Clock is turned off by setting TimerEnabled to false.
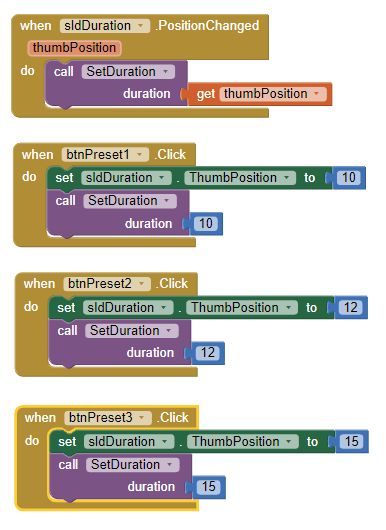
The first part of our blocks code is for selecting the the timer duration, in minutes. The Slider control generates a PositionChanged event whenever the “thumb” is dragged left or right. Each time it changes, we display the number of minutes on screen by calling our helper procedure SetDuration. (This makes it easy to change the format of how the text displays later – we only need to change it in one place inside the procedure.)
The “preset” button Click handlers just set our duration to 10, 12 or 15 minutes (or some other value of your choice).
Note – the thumbPosition value is a fractional number such as 10.4, not 10. It is possible that say a value of 20 gets converted to an odd value on the thumbPosition such as 21.2, in which case, the display may be off a little.)
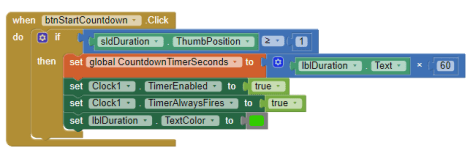
When StartButton is pressed, the CountdownTimerSeconds is computed by multiplying the number of minutes times 60. The Clock timer is turned on and the color of the on screen text is set to green.
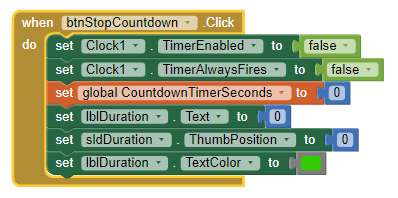
When the Stop button is selected, the Clock timer is disabled and all values are set back to zero minutes.
Exit closes the application.
The Clock Timer Handler
The guts of the app are in this handler. Click on the image to see the full size image. Below, are images showing selected areas of this code.
The basic operation is that the Clock timer event happens once every 1,000 milliseconds (1 second). Every second, the CountdownTimerSeconds variable is decremented by one.
The remaining seconds are then converted into the format minutes:seconds for display on the screen.
Some additional code at the beginning of the event handler determines when to issue the 3, 2 and 1 minute alarms.
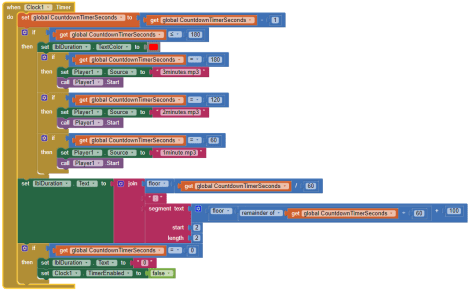
At the beginning of the event handler, we first subtract one from the number of seconds remaining. If we just dropped below 180 seconds (3 minutes), we change the color of the time remaining to red.
Right when we hit 180 seconds, we also play a 3 minute warning, and then at 120 seconds, a 2 minute warning, and finally a 1 minute warning at 60 seconds remaining.
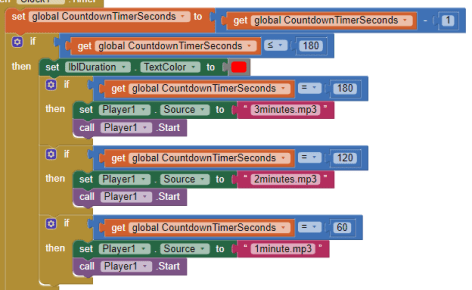
The warning is played out using the Player1 component. First we assigned the audio file to the .Source property and then call the .Start method of Player1 to begin playing the mp3 file. Player1 runs in the background – that means, the audio file plays out while our timer app continues to count down the seconds.
This is an important item to understand when putting code inside Clock event handlers. For example, if our Clock timer interval is very short, say 10 milliseconds (instead of 1,000 milliseconds as in our app), then we need to make sure our handler code executes very fast. We do not want another timer event to happen before we finishing handling the first event. For this reason, the code that runs inside a Clock event handler should be relatively short and quick. If the handler needs to initiate a longer operation, such as writing data to a file, it’s best to set a global flag indicating data should be written out – and put the data writing some where else in the program.
Another, more complex way to do this is to use multiple Clock timers – one Clock that process short timer intervals quickly, but sets global flags to turn on other functions – and then an additional Clock timer that runs less often (say every 5 seconds). The second Clock handler checks the flag and if set, performs the time consuming function. Another way is to break up the time consuming function into small steps. For example, instead of writing out a big file, just write out one line of data at each Clock interval. How this is handled can get rather complex and is beyond the purpose of this tutorial. But its important to be aware that you need to keep your Clock handlers short and fast.
The next section of code formats the seconds into minutes:seconds so that, say, 121 seconds is displayed as 2:01 time remaining.
We convert the seconds by dividing by 60 and removing the fraction – the floor math function converts, say, a value of 1.5 to 1 by removing the decimal fraction part.
However, we need the fractional part – or the remainder of what’s left over after dividing by 60 to extract the seconds. For example, if we have 90 seconds and divide by 60, we get 1.5.
We strip out the fractional part to give us “1” – and that’s the minutes.
To get the seconds, we use the remainder of .5 and multiply that by 60, giving us 30 seconds. Hence 90 seconds is converted to 1:30 in the usual minutes:seconds format.
We could stop at that however, what happens when we get to 9 seconds? Our display would look like 1:9 rather than 1:09.
To fix that we use a programming trick. We actually add 100 to the seconds so that all values are of the form 109, 110, 111, … 130. We convert that to a text string (which happens automatically) giving us “109” or “110”. Then we use segment text to extract the 2nd and 3rd characters – e.g. 09 or 10, giving us our properly format seconds value.

Source code
Download from MIT App Inventor Gallery: BatteryTimer

Thank you for this awesome article. Hope to learn more in future.
LikeLike
it was a great fun reading. thanks a lot
LikeLike