Category Archives: Android Development

A countdown timer app to avoid empty #quadcopter batteries

One of my hobbies is building and flying small quadcopter radio control (RC) aircraft. Most RC aircraft use a one way transmitter – the remote control is the transmitter and there is a receiver on the aircraft to process received commands for flying the aircraft. But the aircraft does not transmit anything back to the control unit – you have no way of knowing when the battery is about to reach empty!

Some RC aircraft use Wi-Fi or proprietary links sending data in both directions – those quads send an alert when the battery is low.

But for simple systems, there is no alert!

A crashed my small quad recently due to draining the battery. I was flying it back to land when its battery died. While only 2 meters off the ground, it came down hard and damaged a prop and motor. (I was flying at an AMA approved RC model airfield so this was all done safely over a grassy area.)

To solve this, I decided I needed a count down timer app that gives me an alert after 10-15 minutes of flying.

That’s where App Inventor comes in.

User Interface View

To set the countdown timer, move the slider control to select a number of minutes between 0 and 59. Or, select one of the “preset” buttons which set the time limit to 10, 12 or 15 minutes.

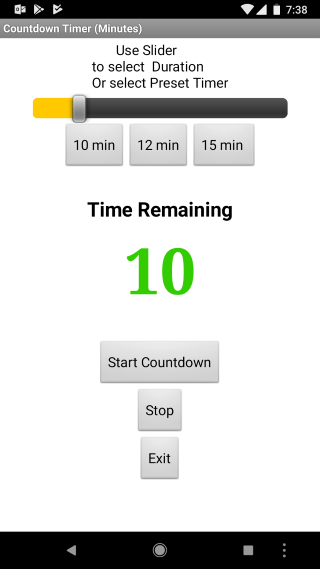
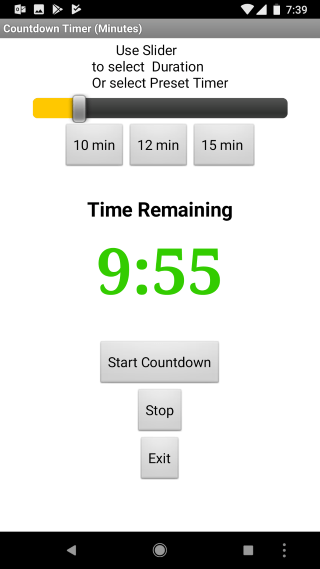
Press the Start Countdown button to activate. The count down timer shows the remaining time in minutes and seconds.

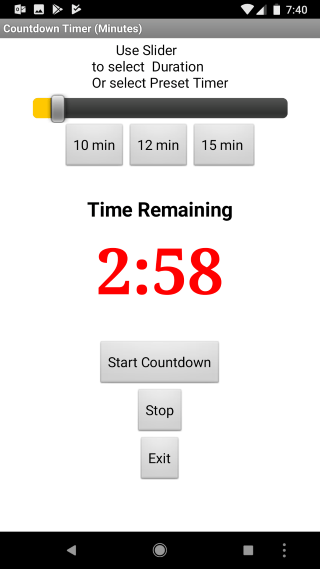
Once the timer reaches 3 minutes, the remaining time color changes to red and an audio alert “3 minutes” is played. At 2 minutes, there is a “2 minutes” alert and then a “1 minute” alert when there is 1 minute remaining.

The Stop button stops the timer and resets everything to zero. The Exit button closes the application.

Continue reading A countdown timer app to avoid empty #quadcopter batteries

Can you create an MIT App Inventor app without a computer? YES

Several people have asked me if it is possible to create an Android app without using a computer. Yes, it is possible!

All you need do is access appinventor.mit.edu in the web browser on your Android device. App Inventor works the same as it does on a computer.

You’ll need to go in to Android Settings | Security and check the option to allow installation of apps from Unknown Sources.

Then, in the App Inventor web interface, you will use Build | App (save .apk to my computer). The app will be “compiled” (translated into an executable program file for Android known as an “apk” file – short for Android package) and then downloaded to your computer.

The download part will vary depending on what browser you are using as well as what version of Android you have. You might find the download icon (a down arrow) in the notification bar. Swype down from the top and then select the downloaded file, open it and select Install to install your app. Once installed, you can run the app directly – or the app will appear in the list of apps installed on your device and you can run it directly from the app list. The exact way this all happens will vary depending on your system and browser.

The following video tutorial shows I how I did this on Android using the Opera browser. Note that I used a Bluetooth keyboard and a Bluetooth mouse – so the screen looks like I am using a computer because I am not touching anything!


Google introduces Blockly 1.0 for Android, iOS and web

If you have used MIT App Inventor (and of course you have!), you can quickly adapt to using Blockly for programming.  Blockly is basically a “Drag and Drop” code editor (like in App Inventor), providing a visual programming system. It uses the same ideas as MIT App Inventor.

To see it in operation, visit MIT’s Scratch project to create a simple program.

Google has released code libraries that, when combined with other tools, enable use of Blockly to create code for the web, for iOS and Android. For iOS you also need XCode and for Android you need Android Studio. Blockly is not a programming language itself; it outputs code in JavaScript, Python, Lua and other formats.

Source: Google Developer’s Blog

WATCH THIS VIDEO!

(FYI I am half way through my period of traveling too much and not getting much programming done!)

Brief update

I’ve been busy with other projects, traveling for work, and other tasks, that have cut into my App Inventor posts. Sorry about that!

One task I have been busy with is a project from AV8 Designer LLC to create an aircraft wing tip protection system. The system places proximity sensors on the tips of aircraft wings to detect – and help prevent – collisions with obstacles during aircraft ground movement operations. Aircraft are pushed and pulled around on the ground during all times of the day and night, and during all types of weather. They are frequently squeezed into aircraft hangers and parked extremely close to other aircraft. Unfortunately, this leads to occasional wing tip collisions that are expensive to repair.

The wing tip sensors provide audio and visual alerts of potential collisions and status (with audio and visual display) on Android tablets or smart phones carried by ground crew. The Android app is simple to use but incorporates complex programming to wirelessly communicate with all wing tip sensors. The app and the wireless communication links were implemented using App Inventor, rather than the Android Java SDK.

We took a risk in choosing to use App Inventor. While preliminary experiments were done to verify the concept, we did not know if we could develop the full application in App Inventor. Well, we took the risk and everything worked out great. Using App Inventor we were able to quickly develop – and demonstrate – the user interface and functionality. In doing this project, we proved App Inventor is capable of creating powerful and complex industrial applications. App Inventor can do much more than only educational and gaming applications!

Appy Builder – an alternative to MIT App Inventor, with more features

AppyBuilder is a commercial version of MIT App Inventor that, for a monthly subscription fee, provides access to many additional components and features. Some of these features include monetization services that work with advertising networks to display ads with your apps, plus unique features like SQL Lite and the Android Material Design user interface.  You can also add in-app purchases.

There is also a free version that operates similar to MIT App Inventor. You can set up your free account at the Appy Builder web site or sign up for a subscription account with added features.

AppyBuilder is based on MIT App Inventor – if you know how to use App Inventor, you’ll find AppyBuilder very easy to use. The company behind AppBuilder also does custom app development and mobile web site development.

Click on their “Tell me more” button, and then page down to see the description of features and services, and subscription options.

I’ve played a bit with the “free” version but I could see buying a monthly subscription to access several of their enhanced features. Their lead architect also has a blog including this tutorial on how to use their components to access the web, camera and upload photos to a server using App Builder.

—-

Since I moved the web site from my own server over to the WordPress platform, you will often see posts authored by “Coldstreams”, or sometimes “AppinventorPlus”, rather than my name, EdwardM, that appeared on the old web site. I have 4 separate accounts on WordPress and set them up so that my Coldstreams account can update any of the blogs, including this one. Most of my posts will likely appear with the “Coldstreams” name, but it is still just me 🙂 … EdwardM

Fewer professional coders in the future?

That is the actual future of software development: It will become so easy and second nature, that for ordinary tasks you won’t even have to think about it.

Source: Dear Google, the future is fewer people writing code | TechCrunch

Tools like MIT App Inventor, and others, are making programming so easy that it no longer requires extensive training and high levels skills to create many types of useful programs.

Specifically,

Writing code will become less and less necessary, making software development more accessible to everyone. This will allow people to solve new and unique problems for themselves, and true software engineers will continue to find ways to empower others through various platforms.

We used to call people who wrote programs, programmers. Later, this was change to titles like software developer, software engineer or sometimes computer engineer. Today, the media has short circuited the entire field to just “coders”, which seems like a downgrading of skills and title.

Using Location Information and GPS for finding your position

This tutorial introduces location services features available in App Inventor.

A future tutorial will demonstrate these features applied to specific applications.

About Android Device Location and GPS Features

Your Android device probably has built-in features to identify the device’s location. These features may include:

  • Global Positioning Satellite receiver (GPS)
  • Cellular network location information
  • Wi-Fi network location information

The GPS receiver interprets special (and very weak!) timing signals from satellites and uses those signals to compute latitude, longitude and altitude of your device. GPS has fairly good accuracy – correctly identifying the device’s position within as little as 5 meters (but which may at times be much wider such as within a 30 meter diameter circle accuracy). GPS accuracy is affected by the device’s ability to see the sky and may be blocked by buildings, trees and weather, and signals may suffer from ionospheric effects.

Cell phones can obtain information about the cellular network tower to which they are connected, including location information from the cellular tower.

Wi-Fi networks have a unique identifier associated with them (not the SSID public address). Google has built a map of wi-fi access point network locations using a combination of their Google mapping cars as well as everyone’s Android-powered cellular phone to build a huge database of wi-fi access points and their location. Your Android device can use a combination of location data and fetch a postal mailing address from Google for a given location.

Android phones have options as to which type of location information to use.

  • Cellular network information may be the least accurate, but it also uses the least amount of battery power.
  • Wi-fi network position information also uses little battery power, and can provide reasonably accurate location information when your phone is indoors and unable to hear signals from GPS satellites.
  • GPS provides the best accuracy but receiving and processing the signals uses the most battery power.

Your Android phone has options to select High accuracy, Battery saving and Device only.

  • High accuracy – Android will automatically select GPS, cellular or wi-fi to obtain a high accuracy position reading. This is likely the default setting on your phone.
  • Battery saving – Android will use cellular or Wi-fi networks to obtain position information.
  • Device only – Android will use the GPS receiver (greatest battery drain)

To select Location services, go to Settings | Location and set this feature to “On”.

Touch the item labeled “Mode” at the top of the screen to select “Location mode” options. This is where you may choose High accuracy, Battery saving or Device only.

Screenshot_20160516-175035To use any location features, you must turn Location to “On” in Android Settings!

MIT App Inventor has a component named LocationSensor providing access to latitude, longitude, altitude and even the postal mailing address associated with the location.

This tutorial introduces the LocationSensor and the basic properties and features. A future tutorial will go in to more depth.

Continue reading Using Location Information and GPS for finding your position

Using droid-at-screen to see your phone’s display on your computer

droid-at-screen is a free Java-based app that displays the content of your phone’s display to your computer’s display, when the phone is connected via a USB cable.

Below is a screen snap shot taken from my computer display. At the upper left is the Droid@Screen application running.  Droid@Screen is connected to my Nexus 5 phone.

At right is the display showing on my phone, which has been transferred from the phone to my computer over a USB connection. I’ve circled two user interface items – the magnifying glass icon is used to adjust the display size of the phone’s screen. Since the phone has a 1920×1080 display, the initial image is quite large!

Below that is a camera icon. Click on that to take a snapshot of what is on the screen, and then save the screen image to a local file.

Capture

At the lower left is the DroidAtScreen .jar file. This is the Java executable program file. Assuming Java is installed on your system, double click the .jar file to begin running Droid@Screen.

Continue reading Using droid-at-screen to see your phone’s display on your computer

Making “pretty” App Inventor user interface controls

In the real world, “user interfaces” look like electric light switches, push buttons or control knobs, temperature dials on ovens, volume controls on radios and so forth. We can mimic these types of controls for our touch screen Android apps. We do not have to rely on the boring desktop-like clickable button or checkboxes in the App Inventor user interface palette.

A previous tutorial showed a trick to make the color of a button vary continuously. This tutorial shows how to use our own images, instead of the boring button, together with a bit of code to bring these buttons to life.

User Interface View

Below is a sample “toggle switch”. Press the switch icon once and the toggle moves to the right; press it again and the toggle moves back to the left.

toggleswitch1

toggleswitch2

Here is a slide switch. Press the slide switch once and the switch position moves to the right and the switch illuminates in green. Press the slide switch again and the switch returns to the left.

switch1

switch3

Here is a concept for a raised momentary push button. Pressing the button changes the appearance of the button while your finger is on the button – to look like the button is pressed in.

UI1

UI2

The Designer View

Continue reading Making “pretty” App Inventor user interface controls

Measuring Android Power Consumption

I did my software engineering Masters thesis (2012) on Android power management and I learned, as part of my research, that most app developers have no idea how much power their app demands from their Android device’s battery.  Some who thought they were looking at power were confusing other metrics with power. At the time, tools for measuring power were not easy to obtain (costly, and hard to measure power inside a phone).

Now there is an app that provides many metrics about what apps are doing on Android, including power.

Go to the Google Play store, search for Trepn Profiler and install that app (from Qualcomm, who makes the Snapdragon processor used in most phones).

For a quick look at battery power in a strip chart format, select Network Activity and see a chart like this:

Screenshot_20151102-160041

Then select CPU Usage Monitor and identify what percent of CPU time is being used by each app. Initially the display will show “No applications are running” – wait a moment and gradually, apps will begin to show up in the list, with the % of CPU core they are using, shown at right. This may help you spot apps that are using an unexpected amount of power.

If possible, delete apps that you never or rarely use. Many lurk in the background and periodically run a fraction of a second, infrequently. While each individual app has little impact, the total of all apps may start to have an impact that you notice.

For more information about Trepn and estimating power consumption, read the linked article, below.

Trepn Profiler

Source: How to Measure Power Consumption Using Free Software | Mostly-Tech