
MIT App Inventor supports apps having multiple screens, but due to the way that App Inventor is implemented, they recommend that apps have no more than 10 screens total – or risk running out of memory or seeing the Blocks editor crash or hang!
They have a page of information about this issue and you should look at that if you are writing an app with more than about 10 screens.
They suggest it may be possible to simulate multiple screens using just one extra screen, depending on the application. They provide hints as to how to do those hints may be insufficient for new App Inventor programmers.
A reader asked for help on this so I created this tutorial.
Since this app has two screens, this tutorial is split into two sections, one for each screen, and then a third section discussing optional modifications.
The basic app is called ManyScreens. The optional modifications are in ManyScreens2_Buttons (source code links at end of this post)
User View
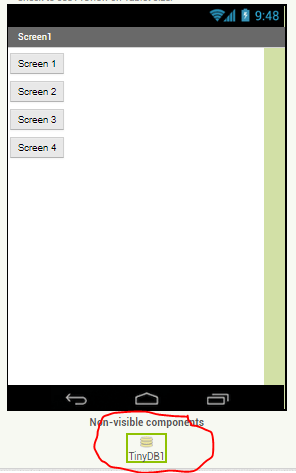
This demonstration app features 4 buttons – the first button displays “Screen 1”, the second button displays “Screen 2” and so on. These buttons could have any label on them appropriate for your application, such as “Register Account”, “Reserve a space”, “Display reservations” or what ever make sense for your app.

Pressing Screen 1 displays this screen – note the label at the top and the photo on the page.

This screen appears when pressing Screen 3. Note that the text label references Screen 3.

The button Do Something! is a placeholder for adding code to do something unique for this screen. For this application all it does is close the screen and return to the main app screen, Screen1.
Designer View Screen1
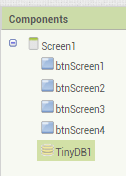
Drag 4 buttons on to the screen, change their text value to Screen 1, Screen 2 and so on, and rename them to btnScreen1, btnScreen2 and so on. Also drag a TinyDB component onto the screen. TinyDB is needed to pass data from Screen1 to our second screen – in App Inventor apps, each screen is like a miniature self contained app and has its own set of variables that are not shared with other screens.
Components List
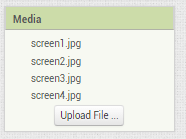
This app displays some images and these have been uploaded to the Media section (just below Components in the Designer View). The images are stored in the apps that were published to the App Gallery (see links at end of this post).
Blocks View Screen1
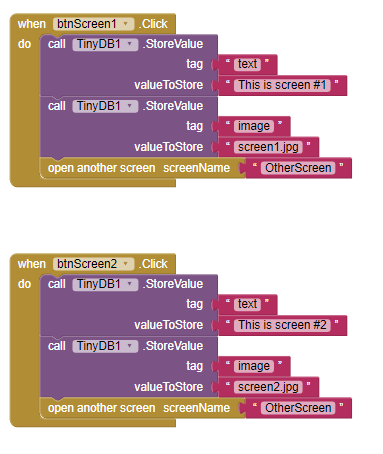
In our Screen1 app, we implement event handlers for each of the buttons. We use the event handlers to store a text label to display on our second screen, plus we store a reference to an image file. Then we call our second screen which is named creatively (not!) “OtherScreen”.
The values “This is screen #1” and “screen1.jpg” are then passed to OtherScreen by storing them in TinyDB.
We implement similar code for each of the four buttons.

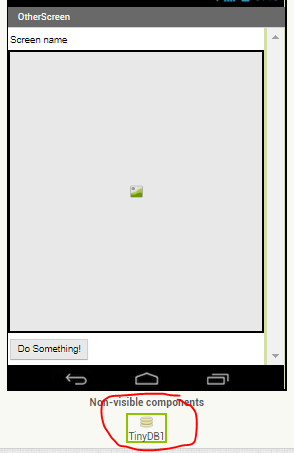
Designer View OtherScreen
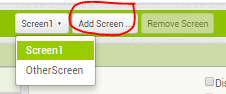
Next, we define our second screen by clicking “Add Screen…” and typing the name for our second screen “OtherScreen”. In this image, OtherScreen had already been created. By clicking on the “Screen1 v” button, we can select the already created screen from the dropdown list.
For OtherScreen, we add a text label at the top to display the text parameter set by Screen1. Then, we add a VerticalArrangement layout and set its Height and Width properties to “Fill Parent. Then we drop an Image component inside the layout and set Height and Width properties to “Fill parent…”.
Finally, drop a TinyDB component on to the Designer View.
Components


Blocks View OtherScreen
The code that implements OtherScreen, reads the text label value from TinyDB and also reads the name of the image file to display. The latter is assigned to the Picture property of the Image control.
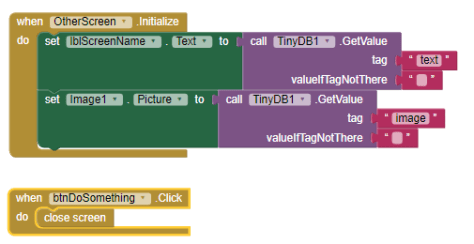
The DoSomething button is a place holder event handler – if our code actually did something, we could add that code here. For now, this code exits OtherScreen and returns to main Screen1.
DoSomething could be written to do something different for each screen. Do this with an if-then block to check the value of the “text” parameter from TinyDB – if it is Screen 1, then do the code for Screen 1, or if it is Screen 2, then do the code for Screen 2.
Modifications – How to put Different Buttons on Each “Screen”
A more interesting version of this app – simulating multiple screens with only one additional screen – shows how to put user interface controls, like buttons, onto the screen and to provide different buttons for each of the screens.
We do this by using the property “Visible“. You may not have realized but controls can be marked as invisible and then do not appear on screen. In this way, we can design our screen to have several buttons, one for each “Screen” and make all the unneeded ones (for a specific screen like Screen1 – invisible).
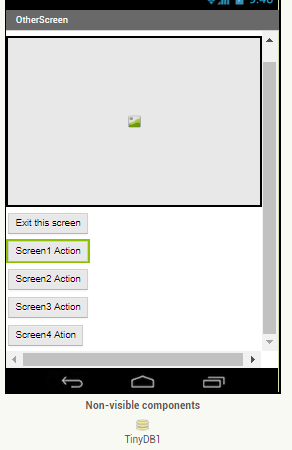
Here is an example screen – you can see that there is now a button control specific to Screen 3, shown at the bottom.

To make this version, I saved a new copy of the previous app and then modified OtherScreen in the Designer View.
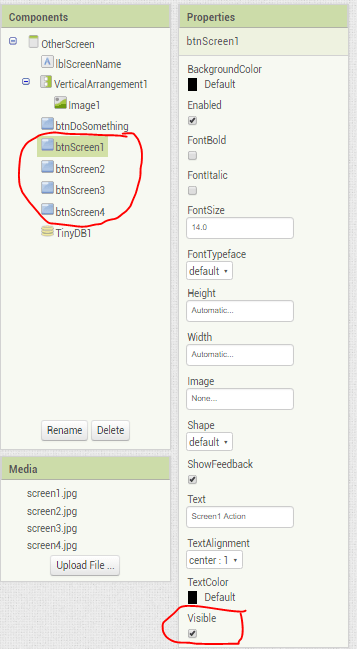
As you can see, I’ve added 4 additional buttons on to this screen.
The Components list now looks like this. Note the Visible property. We could uncheck it here and make the button invisible (in fact, this would be the preferred method). However, when the Visible property is unchecked, the button disappears from the screen in the Designer View! You can still get to an invisible button by selecting the button in the Components list. To keep things simple and obvious in this tutorial, I chose to leave the Visible property as checked.
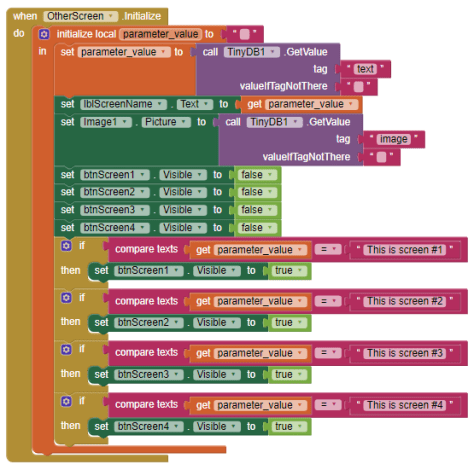
Next we modify the Blocks code. We start out by fetching the “text” and “image” values from TinyDB, just as before.
Next, we hide all 4 buttons on the screen by setting their Visible property to false. (We would not need to do this if set the Visible property to unchecked in the Designer View. Because the controls are set to Visible, they will all “flash” briefly on screen when switching to OtherScreen. That is another reason it is preferable to mark them as invisible in the Designer View.)
Then, we look at the text parameter value to determine which of the four screen we are supposed to show. If we are showing screen #1, then we set btnScreen1.Visible to true, while all the other buttons remain invisible.
That’s all there is to this. You can simulate many screens using just one additional screen if you need to keep within App Inventor’s memory and resource limits. You can also use other types of controls – not just buttons – by setting their Visible property to true or false, as needed.
Source Code
Source code is in the MIT App Inventor Gallery for both versions of this app:
