
A reader asked: Is there is a way to have a control, such as a button, rotate on the screen?
With a simple trick, the answer is Yes!
The trick is to use ImageSprites that are made to look like buttons. Then, instead of .Click event handler, as used on a Button, we use one of the “touch” events defined for the ImageSprite class. To rotate the sprite, change the sprite’s Heading property. Easy!
If you would like to learn more about ImageSprites, please read my online tutorial “Using ImageSprites for animated App Inventor Graphics”.
I’ve also written an inexpensive 227 page e-book all about graphics, animation and charts available from many online e-book outlets. You may find that text helpful to you as well.
Tutorial Video
The tutorial is shown here as a video – or page down for a written version of the tutorial.
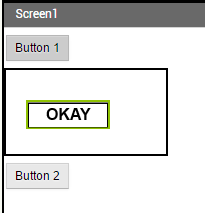
User View
Watch this video to see what a rotating button looks like:
Designer View
Creating the user interface is the same as creating other App Inventor user interfaces – except we use a graphical drawing area called the Canvas and add an ImageSprite to the Canvas.
Drag a Button control to the Designer View and change its text to anything you wish (I labeled mine “Button 1”).
Then drag a Canvas to the Designer View. The Canvas is located beneath the Drawing and Animation heading in the Palette:

After you’ve put the Canvas on to the Designer View, then drag an ImageSprite and drop it on to the Canvas.
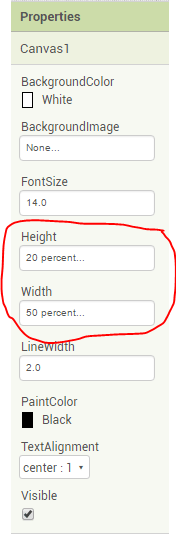
Next, we need to adjust the properties of the Canvas and the ImageSprite. Adjust the Height and Width of the Canvas to a size that is big enough to hold the rotated control. For this example, I set these to a Height of 20 percent and a Width of 50 percent.
Next, assign a graphic image to the ImageSprite. The image can be anything you want it to be. For our user interface control that looks like a button, I drew a simple graphic in a paint program to produce this graphic image that sort of resembles a button 🙂

You can use that in your own program by saving that image to your computer.
Then, upload the graphic to the ImageSprite. Select ImageSprite by clicking your mouse on the ImageSprite in the Designer View, and then go over to Properties and click on the Picture property. Here, select Upload File to add the saved image from your computer to the sprite. In this screen capture, you see that I already uploaded the ButtonGraphic.png file to the sprite.
![]()
The ImageSprite needs to be moved within the Canvas so that we will have room for the image to rotate around through 360 degrees of rotation. Here, we set the X and Y coordinates to position the ImageSprite. For reference, the point at the upper left of the Canvas is coordinate [0,0]. The X-value [X-value, Y-value] increases as we move to the right in the Canvas and the Y-value increases we move downwards in the canvas.
![]()
Components List

Blocks View
And now for the really complicated App Inventor programming:

Hard, huh?
The ImageSprite has several events related to touching the sprite. I selected the TouchDown event. Whenever the sprite is touched, the Heading property of the sprite is changed by adding 45 degrees. Since we start at zero degrees, when we add 45, the sprite will be redrawn at a 45 degree angle.
The Rotates property is a check box item on the sprite’s properties in the Designer View. Check that box – or programmatically set Rotates to true. If it is false, then the Heading value is ignored and we do not want that!
Download Source Code
Source code is available in the MIT App Inventor Gallery.
