A “switch board” user interface panel for App Inventor apps

In the last post, we introduced some concepts for building “creative” App Inventor user interfaces that feature visually appealing user interface controls rather than the usual bland buttons.

In this post, we look at creating an array of toggle switches. Tapping a switch flips the switch from left to right, or right to left.

Concepts

In developing this user interface, we learn two concepts:

  1. We expand on the previous post and its use of images to create custom buttons.
  2. We see how a user interface control can be stored in a list and referenced like a variable within our apps.

Source code:

The User Interface

I called my app “Mission Control” because any good mission control panel needs lots of switches!

The user interface features 9 toggle switches in a 3 x 3 array. The purpose of this app is to demonstrate how to implement this type of interface – the app does not otherwise do anything interesting.

Tapping any toggle switch causes the switch lever to move to the other side of the switch. Here is a screen shot showing some toggle switches to the left and some to the right.

Screenshot_20160204-140323The Designer View

Continue reading A “switch board” user interface panel for App Inventor apps

Making “pretty” App Inventor user interface controls

In the real world, “user interfaces” look like electric light switches, push buttons or control knobs, temperature dials on ovens, volume controls on radios and so forth. We can mimic these types of controls for our touch screen Android apps. We do not have to rely on the boring desktop-like clickable button or checkboxes in the App Inventor user interface palette.

A previous tutorial showed a trick to make the color of a button vary continuously. This tutorial shows how to use our own images, instead of the boring button, together with a bit of code to bring these buttons to life.

User Interface View

Below is a sample “toggle switch”. Press the switch icon once and the toggle moves to the right; press it again and the toggle moves back to the left.

toggleswitch1

toggleswitch2

Here is a slide switch. Press the slide switch once and the switch position moves to the right and the switch illuminates in green. Press the slide switch again and the switch returns to the left.

switch1

switch3

Here is a concept for a raised momentary push button. Pressing the button changes the appearance of the button while your finger is on the button – to look like the button is pressed in.

UI1

UI2

The Designer View

Continue reading Making “pretty” App Inventor user interface controls

What if your App Inventor apps had cooler user interface controls?

How about this – a panel full of toggle switches! Tap a switch to flip the switch from On to Off!

Screenshot_20160118-164605I will soon post a tutorial on creating simpler interfaces than the above, but that will be followed by a tutorial to create the above “panel of toggle switches”.

I have ideas for many interesting interface components – I do not yet know if all of them can be built in App Inventor – but we will see!

appinventor.pevest.com server is back online, 18 Jan 2016

The server that hosts the appinventor.pevest.com virtual server suffered an outage late on January 17th, continuing into early January 18th. The Internet Service Provider that hosts the server has restored service. From their note to me, it seems there may have been a denial of service attack on their infrastructure.

I was in the midst of writing a new tutorial on creating “pretty user interface” components in App Inventor; that tutorial was lost in the outage. Not as bad as it sounds as the code and illustrations were all saved – I just need to rewrite the text.

Writing Android apps in Javascript

Another way to develop apps for Android is to write apps in the Javascript program scripting language (note – Javascript is not related to Java, in spite of the similar name). By using a special platform called Cordova, it is possible to package Javascript programs into a self contained Android .apk file that runs on the Android OS.

Even better – it is possible to package your Javascript app, using Cordova, into forms that run on iOS (iPhones and iPad) and Windows Phone too!

Continue reading Writing Android apps in Javascript

Graphical programming and robotics-the tools get better and easier

MIT App Inventor is a “graphical programming language” in that we assemble programs by clicking and dragging symbols on screen, interactively, rather than writing our programs as text.

This weekend, FIRST Robotics kicks off its 2016 season. Students will design, construct, test and deploy a complex robotic system to meet the 2016 competition challenge (to be unveiled on Saturday).

The robot control system may be programmed in C++, Java, National Instrument’s LabView, RobotBuilder and/or GRIP.

Continue reading Graphical programming and robotics-the tools get better and easier

Interest in App Inventor continues to grow

The following chart comes from Google Trends, and reflects the growing interest in App Inventor, based on searches for “MIT App Inventor” on Google.

MITAppInventorTrend

Because App Inventor has been viewed as a training tool in K-12 level schools, and some introductory college courses, searches for App Inventor information have gone down during the northern hemisphere summer months, when school is not normally in session. This accounts for the up and down movement in the trend line.

This chart shows a relative level of interest for the top countries searching for “MIT App Inventor”.

Region

New Feature! Save your blocks code as an image file! Print blocks code!

App Inventor Elsa Consulting passes this along on Facebook:

Tip: Right click for download blocks as png Image!

Source: App Inventor Elsa Consulting

In case the link does not work, here’s an example – right click on a blank space in the Blocks editor view and get this pop up menu:

SaveBlocksAsImage

Select “Download Blocks as Image” and it downloads a graphic image of all of your blocks – which you can then print out if you want – finally!!!!!!

(FYI – my posting here on this blog is sparse for a little while longer. Been remodeling our kitchen which means lots of time and living in a mess. But I have gotten a lot of work done on Volume 4 of the App Inventor guide. Hope to introduce Volume 4 in about one month – with many neat features coming!)

Scanning bar codes and QR Codes with App Inventor Apps

Overview

App Inventor supports scanning of product identification “bar codes” and QR codes. Bar codes are typically found on consumer product packaging. QR codes are used for web addresses (so you can scan the QR code and go directly to the web address), part and product inventory tracking, and to deliver short messages.

In this tutorial, we create a simple App Inventor app to scan bar and QR codes.

Update: José Luis Núñez provides his own tutorial (in Spanish) for a bar code scanning app to check seating in a theater (written in App Inventor). Watch it on Youtube here:  Curso de App Inventor 2 (José Luis Núñez)

User Interface

Our App Inventor app has a simple user interface – a single button to scan either a bar or QR code. When pressed, the app activates the camera to scan the code and then returns a result value.

If the code is a numeric bar code value, the app displays a web page of information about the item corresponding to the bar code. If the returned code contains a web address, then that web address is displayed on screen. Here is an example from scanning the UPC code on a package of tea:

Screenshot_20151130-134823
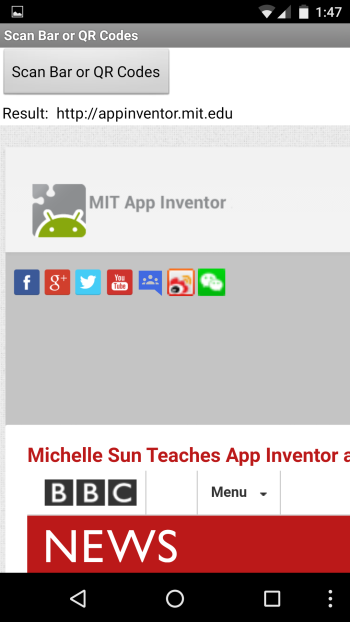
In the next example, a QR code containing http://appinventor.mit.edu is scanned:

static_qr_code_without_logoAnd here is the result:

Screenshot_20151130-134746Designer View

Drag a WebViewer component from the Palette’s User Interface section, and drag a BarCodeScanner component from the Sensor’s section. The WebViewer is the “earth” icon in this screen, and the BarCodeScanner is an invisible component, below the canvas area.

BarCodeDesignerTwo labels are used – one to display the text “Result:” and the other to display the returned code.

BarCodeComponentsBlocks Code

To activate the BarCodeScanner, we call the DoScan method:

BarCodeBlocks1The above activates the camera and displays a view on screen (in Landscape mode). Once a bar code or QR code is successfully scanned, the camera is automatically turned off and an AfterScan event is generated.

The AfterScan event has one parameter named result; this contains the converted scan code – a numeric value for a bar code or an http:// URL for a web address (anything else is displayed in the lblBarCodeResult label, on screen).

BarCodeBlocks2Creating QR Codes

To create your own QR Code images use any of the QR code generators available online – just search for “Create QR Code free” – I used http://www.qrstuff.com/

Download Source

Right Click (or Ctrl-Click on Mac OS X) and choose “Save as” (or similar wording): BarCode_Scanner.aia

E-Books and Printed Books

If you find these tutorials helpful (I hope you do!) please take a look at my books on App Inventor. To learn more about the books and where to get them (they are inexpensive) please see my App Inventor Books page.

  • App Inventor 2 Introduction (Volume 1 e-book)
    Step-by-step guide to easy Android programming
  • App Inventor 2 Advanced Concepts (Volume 2 e-book)
    Step-by-step guide to Advanced features including TinyDB
  • App Inventor 2 Databases and Files (Volume 3 e-book)
    Step-by-step TinyDB, TinyWebDB, Fusion Tables and Files
  • App Inventor 2 Graphics, Animation and Charts (Volume 4 e-book and printed book)
    Step-by-step guide to graphics, animation and charts

Thank you for visiting! — Ed


MIT App Inventor “Extensions”

Some new “extension” features are available for testing in App Inventor at MIT App Inventor Extensions. The 4 extensions include vector addition, simple image processing, simple audio processing to identify the pitch of a sound, and the addition of multi-touch gestures to the Canvas.

I have not yet had time to try these but this is a sign of things to come as 3rd parties can begin to develop extensions to the core set of App Inventor features.

Look forward to trying these out! Click on the link above to take a look.

The quick and easy way to write Android Apps